Monday, 21 February 2011
Blog design is starting. Yeah. For realz. (Yes, realz.)
(I know this is sort of random... but I am a random person and I like cupcakes.)
Greetings! (Just kidding, I don't actually say "greetings". Ha.)
If you haven't noticed, Gracely Designs got a facelift. (I'm still working on it, but at least you can read the words.)
I have learned a scary amount of HTML in just a few hours. Seriously. Scary.
I really enjoy it, though. I think it's fun.
That's why I'm starting blog design. For YOU.
I'm not awesome, nor a pro at this. I'm not going to charge you guys for the time being. I'm going to work hard on your blogs.
I will be writing more about this later today. (Ya know, the deets.) Expect another page titled "blog design". If you are interested, you can email me now or email me in a few hours when I have the post up.
I think this will be fun!
*confused? Olivia of Robin Blogs put my post up for Grace Loves the Beatles earlier today, so I didn't do that. I did, however, design this blog you're looking at right now.
Friday, 18 February 2011
How to make a header for your awesomeness blog.
Level: Medium
want to know how to make an awesome header?! fantabulous. (fantastic+fabulous, if ya didn't know.) i use pse8, but you could probably use picknik. or gimp. or whatevs. (i'm not familiar with those so, srry yall.)
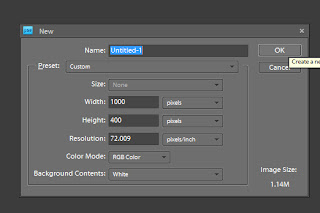
Make a new document. (CTRL+N). Your blog has to be 1000 pixels wide for this. Make it about the size below:
100x400, approx. 72 resolution, RGB color mode, White background contents (NOT transparent or grayscale. please.)
Are you a photographer? want pictures on your header? it's your lucky day!! {not a photographer type? don't you fret! just scroll down and i'll show you how to make a pretty header without a nikon/fstop/d-whatever stuff.}
So now you have a big. white. box. Painfully boring, i know.
First, to make it not boring, you should choose a color. You can use the dropper tool if you feel fancy, or you can just choose a color from the color-chooser-thingymabob.
See? Not as boring. But it can still be better. just saying.
Now, open your picture, and click CTRL+A so the little ants start crawling around the picture. Then click CTRL+c to copy. Go on the brightly-colored header layer and click CTRL+V to paste. Then use the arrow tool to resize and drag it around until you like it.
Save to your computer.
you're done!
Need help uploading? Click.
Any questions? Click.
Now, i'll show you how to make a non-photo header, for if you're not a photographer or just don't want pictures on your header.
CTRL+N and make a new file. (Make it the same size as the photo header.)
Making a photo header is really as easy as color chooser, text, and maybe custom shape tool.
Put your text on there...
Now let me teach yall about custom shape tool. (Again, i don't use Picnik or gimp, so I don't know if there is a custom shape tool.
Find the heart on your toolbar. If it's not a heart (in that place under the fill tool), select the tool under the fill tool and click U (just the letter U) and scroll through them until you reach the heart. Now, you can go up into the left hand corner and there are loads of shapes and pictures to choose from! It's one of my favorite things on photoshop. Just click the drop down box and look through them. There is a little double arrow, and if you click on that a list drops down, catergorizing all of them.
I chose the lollipop one.
Then, your mouse turns into a + and you click and drag on where you want the shape. (You can move it later if you mess up.) Done!
Subscribe to:
Comments (Atom)


