Showing posts with label tutorial. Show all posts

Friday, 17 June 2011

tutorial: actions in photoshop elements

Hi there! Sorry, I've been neglecting this blog. (Spoiler alert: i forgot about it.) I have gotten some great emails requesting tutorials to be posted here, and one of them was actions in photoshop.

Ok, so, basically, an action is a bunch of steps in photoshop, saved to a file that you download. (Am I right? Let me know if i'm wrong, k?) You can download them from a bunch of places, free or not, and I'll list a few of my faves down below. If you want to use actions, you need to follow this tutorial. It looks a little overwhelming, but just take it step by step and you'll probably survive.

So, to make this more of a post than just linking to another tutorial, I wanted to share with you some of my favorite places I download actions from, and some of my favorite actions!

The CoffeeShop Blog: This is my favorite. They have sooo many. AND, if you're a Lightroom kind of person, they got YOU covered too. No need to thank me.

Pioneer Woman: she kind of goes without saying, because, you know... she's famous and stuff.

AMP Actions: I haven't bought any of hers, (just got a couple of the free ones), but I love mine and I think the paid ones are pretty snazzy too.

And here are a few of my favorite specific actions.


There you have it, folks. The inside scoop on my favorite actions. What are a few of yours? Free, or not?

I'm looking forward to not neglecting this blog this summer (mama won't play favorites anymore), but I'm running out of ideas for tutorials. I mean, I'm not you, i don't know what you want to know. You know what you should do? Email me to request a tutorial! I can't promise I know everything, but if I do know i'll share. :)

xoxo
grace

p.s. I just realized that I typed "Vintage Truffle" instead of "Velvet Truffle". Silly me.

disclaimer: i was not paid to link to any of these sites. you think i know the pioneer woman? you're crazy. I'm not that cool.  yet...


Friday, 29 April 2011

how to save your images for the web

I just opened up Gracely Designs to post my saving images, and I did a double take at the followers widget.
63.
63?!
63 people like my blog enough to get updates of it! Holla!
That makes me so happy. I mean, I only have 25 posts!

Well, that made my day, now moving on to our last photoshop tutorial before going back to our regular blog design posts. I have a few in mind that I will post in the next few weeks, so stay tuned y'all!
now, moving on to how to resize for web. i'm a rule follower at heart so credit needs to be given where credit needs to be given... i learned this from my mom, rachel at and then she {snapped}. i think she just thought this up by herself!

first step... open your photo and do all of your pretty editing stuff to it!


once you're happy with your photo, go to File > Save for web. This box will pop up.

Don't worry, it's OK. Just click "yes".
Now, you get to this page.


First thing we're gonna do is change is "Custom" to Jpeg High, Medium, or Low. Here's an example of all three.

low

medium

high

So, as you can see, the quality goes up or down (Low being the lowest quality) so it's really just up to what you're using the photo for. For blog posts, I usually use High, but keep in mind that I do XLG pictures that take up most of my blog, so it has to be pretty high quality. If you're doing Medium or Small photos, Jpg medium or low would be fine.

So, this is where you change from "Custom" to "Jpg High/Low/Medium".


Next you're going to change the numbers (you can see where on the photo below) to make the Width 800. It will automatically change the height.


When you're done with that, well, you're done!
If you have any questions, email or leaving a comment is the best way of contacting me.
But really, how else would you contact me!?
Happy Friday guys.


Monday, 25 April 2011

some new stuff.

salutations people!
we've gotten almost 10 new followers in the past day.
CRAZY!
i just want to say welcome to our new followers. i hope you like it here!

another thing is that this blog got a makeover. It's been many designs in the past week or so, but i think this one's here to stay for the month of May... maybe. please replace my orange flowery button with the button on my sidebar. thanks!

many of my new followers have stumbled upon this blog from and then, she {snapped}'s awesomesauce package giveaway! if you haven't entered, you have until friday. you could win a free awesomesauce package! i'm sponsoring many giveaways, so if you don't win this one, please don't cry.

I learned how to do removable backgrounds and will adding that to my packages. you can see an example of the background here, on my personal blog. just know that if you buy the sweet blogger giveaway or the awesomesauce, you get a background too. you have to purchase a scrapbook kit for this, however. more information on this later, pinky swear!

the next tutorial will be how to save you images for the web. this is super easy and super helpful! i've seen on a few blogs that they have ran out of space in blogger and it wants to charge them. if you use this, your images will take up virtually no space in blogger. ta da! so that's coming soon, so stay tuned... probably Friday at the latest. that will be my last photoshop post, and then back to blog design tutorials! if you're strictly here for the blog design tutorials, please forgive me. i just wanted to have a little more variety with my tutorials.

i hope you lovelies all had a lovely Easter weekend... i sure did! have a nice week and i'll see you sometime in the week. :)

Saturday, 23 April 2011

Editing in Adobe camera Raw

Today is a very special day because (1) It's the day before Easter and (2) we're going to talk about editing in .jpg RAW! Now if that's not the most exciting thing you've heard all day I don't know what to tell you.

So lately this has been a mostly blog design blog with a little bit of blog design tutorials and that's not how I want it to be. I want to teach people about blog design, if blog design isn't your thing why not learn about photography and editing? When I started this blog I knew that it would end up pretty random because I'm a random person. If you read my other blog, which has everything from POTD's to fashion to whatever, I would be surprised.

So that's why I've decided to not care about being random and talk about random stuff! If that even made sense.  Let's get started, shalllll we?

Today I'm going to talk about editing a .jpg in RAW. It sounds so nerdy! It kind of is, too, but frankly, I don't care about being nerdy if it means my photos turn out good. This tecnique I've been using a ton and it's super easy. When i just need a simple touch up this is what I do. I've been hardly using any actions lately because I can get the same affects of some of my favorite actions just by using this.

If you didn't know, I'm using Photoshop Elements 8. I'm not sure but I know you can do something super similar to this in Lightroom (the link to a great video explaining doing this in Lightroom is here.) Go to File > Open As. Choose your photo but don't open it!

Make sure that you open it as an Adobe Camera Raw file, or this won't work.

Then this purdy little box will open. Just play around with it! It's awesome!

Here's the same photo (it was blah SOOC but it was in focus, so I still liked it) edited in different ways using this method.

auto

temperature and contrast +30


white balance : auto, blacks and brightness +5

There's so many more combinations but this is just a few.
I hope this helped you! If you have any other questions just leave a comment here or shoot me an email.


Oh! That reminds me! Gracely Designs got it's own email. The email address is now gracelydesigns(at)gmail(dot)com. I've actually had this email address since Gracely Designs started, but I forgot about it since I do things like that. From now on, all orders and questions/comments about tutorials, or anything regarding Gracely Designs will got there instead of my personal email address. Cool, right?! Suuure, Grace. Totally cool.

Happy Easter everybody! Have a great Easter Sunday!

Wednesday, 6 April 2011

how to make your blog 3-columned

this might be a "DUH" moment, (i know it was for me) but i finally figured out how to make my blog 3 columned! turns out, it was all in template designer! ha! silly me.

so, go to you dashboard and click on design. from there, click on "template designer", and from there click on "layout".
see?! so easy!
{kudos to nicole for helping me "figure this out". ha!}
happy thursday friends!


Monday, 4 April 2011

how to schedule a blog post

hey! it's been a while since my last tutorial (not really) so i wanted to put a new one up. again, this might be super obvious, but i go looking on the internet for super obvious things to. so.
the first thing you need to do is... {obviously}... write your post.
now, click "Post Options". (where the little finger is pointing.) A drop down box that looks like this should show up.
choose your time and your date and your post should post at the time you set it to.

questions? email me.
comments? leave a comment down there.

also: read this.

have a nice monday!
xx


Friday, 25 March 2011

snipping tool on Windows 7

alternatively titled: We're BAAAAAAAAAAAACK!

i knew this would happen. i just knew it. i would start blog design and then totally neglect the tutorial part of it. i have been thinking all dang week for a tutorial to do, (so if you want me to do one, i'm not an expert or anything, but leave a comment or email me!) and so i am just going to share how to use the Snipping Tool on Windows 7. I'm not sure if this works on windows xp or any mac stuff, so sorry. you can try it, but no promises. ;-)

so the tool is used to "cut" stuff from the page and you can save it to your desktop and then upload it to blogger, FB, etc. EXAMPLE:
(i use this a lot with giveaway winners.)
so y'all want to know how to do it?
*YEEEEEEEEEEEEEAH!!!*
ok, let's get started kids!

so here is my page that i am going to "take" something from. (this is just a screen shot, don't freak out.)
if you're using Random.org, you'll need to pick your number first.
Now, click this button on your keyboard:
mines in black and white, but i dont know about yours.
Then, on the menu that *should* pop up, click the "Snipping tool" button thingy. then, it should make your screen white-ish, like this. Then, just "crop" the place that you want and a new box should pop up. then just save the picture as a JPG to your computer and do whatever you want with it!
well, bifornow!

Friday, 18 February 2011

How to make a header for your awesomeness blog.

Level: Medium
want to know how to make an awesome header?! fantabulous. (fantastic+fabulous, if ya didn't know.) i use pse8, but you could probably use picknik. or gimp. or whatevs. (i'm not familiar with those so, srry yall.)

Make a new document. (CTRL+N). Your blog has to be 1000 pixels wide for this. Make it about the size below:

100x400, approx. 72 resolution, RGB color mode, White background contents (NOT transparent or grayscale. please.)

Are you a photographer? want pictures on your header? it's your lucky day!! {not a photographer type? don't you fret! just scroll down and i'll show you how to make a pretty header without a nikon/fstop/d-whatever stuff.}
So now you have a big. white. box. Painfully boring, i know.
First, to make it not boring, you should choose a color. You can use the dropper tool if you feel fancy, or you can just choose a color from the color-chooser-thingymabob.

See? Not as boring. But it can still be better. just saying.
Now, open your picture, and click CTRL+A so the little ants start crawling around the picture. Then click CTRL+c to copy. Go on the brightly-colored header layer and click CTRL+V to paste. Then use the arrow tool to resize and drag it around until you like it.


Save to your computer.
you're done!
Need help uploading? Click.
Any questions? Click.


Now, i'll show you how to make a non-photo header, for if you're not a photographer or just don't want pictures on your header.
CTRL+N and make a new file. (Make it the same size as the photo header.)
Making a photo header is really as easy as color chooser, text, and maybe custom shape tool.
Put your text on there...
Now let me teach yall about custom shape tool. (Again, i don't use Picnik or gimp, so I don't know if there is a custom shape tool.
Find the heart on your toolbar. If it's not a heart (in that place under the fill tool), select the tool under the fill tool and click U (just the letter U) and scroll through them until you reach the heart. Now, you can go up into the left hand corner and there are loads of shapes and pictures to choose from! It's one of my favorite things on photoshop. Just click the drop down box and look through them. There is a little double arrow, and if you click on that a list drops down, catergorizing all of them.
I chose the lollipop one.
Then, your mouse turns into a + and you click and drag on where you want the shape. (You can move it later if you mess up.) Done!


Sunday, 23 January 2011

How to upload your header through photobucket

Level: Easy

There has been some problem through blogger that if you upload your header from your computer, it gets all blurry and icky and OMG if I don't get that fixed I am going to flip out-y. (well, maybe that's just me.) But anyway, IT'S NOT YOUR FAULT. IT'S BLOGGER'S FAULT.  And heres how y'all's can fix it.

You have to have a photobucket account. Not a flickr, a photobucket. Design your header however you want it (if you don't have it already) and then upload it.

Now, view only the header that you uploaded, and click the "Direct link" button. It will automatically copy the link for you.

 Now, you go to how you would usually upload your header. If you don't know how to do this, click here. But, instead of uploading it from your computer, click "From the web" which should be under the browse box. Copy the post into there and click "save".

If your header is perfectly centered, that is great, don't do anything from here. Mine wasn't, so i had to take these steps.

We are going to use some HTML. Don't freak out, it's ok. CTRL+F really helps. Click CTRL+F and in that box, search for [[><b:skin>. Directly before that, paste the following:

#header-inner img {margin: 0 auto !important;}

This should work! Now enjoy your perfectly centered header. (and non blurry.)


Monday, 17 January 2011

how to watermark your photos

alternative title: my first photoshop tutorial

Level: medium and a half
Yes, this is my very first photoshop tutorial. I will use PSE8 for all of my tutorials. I think that watermarking is a great idea... it gives your photos a personal touch and keeps bad guys from stealing your pictures. 

The first thing you need to do is start a new document. {control+n}. It doesn't really matter the size (it just can't be super tiny) because we will crop it later. In the drop down box, make sure it says "transparent."

now is the creative part. what do you want it to look like? you can use custom shape tool, fonts, whatevs. have fun with it.

next, it's time to crop it. you want to crop it pretty closely around the shape. (i don't know if this really matters, but this is what i do so whatevs.)


now its time to save it as a watermark. you go to edit > define brush. name it, click OK and your you're good to go!

to watermark them, you must be on the brush tool. Go to the drop down box and scroll down to the bottom. You will find your watermark there. Then, simply stamp the watermark on your photo. You're done!

questions? email me at gracie.drechsel@gmail.com.
peace out, yo!


Friday, 17 December 2010

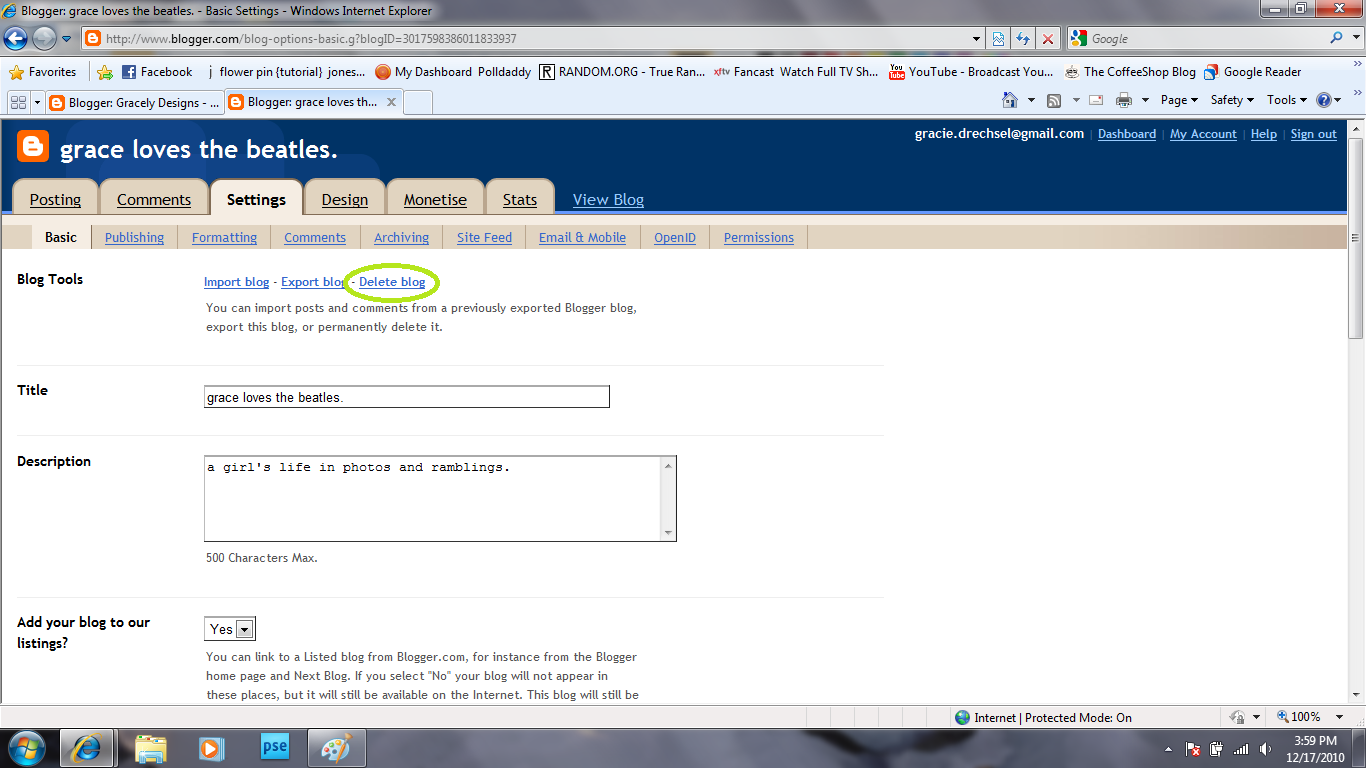
How to delete your blog

Level: Easy
if you have decided to delete your blog for whatever reason (you need to start over, you need to take a break from blogging, HTML is driving you nuts, whatever,) This is for you. You should think about it before you delete your blog if you have been working on it for a long time {obviously.}

1. Sign into blogger.
2. Go to your dashboard and click "settings".
3. It will take you to the "Basic" page of your settings.
4. Deleting your blog is the first thing there. Simply click "delete blog."
5. If you need to restore that blog, you do that by simply going to your dashboard. The blog that you have deleted will be in a faded font. Just click "undelete this blog" and your blog is back up and running! You have 90 days until your blog is permanently deleted.

Wednesday, 15 December 2010

How to delete word verification from when you comment

Level: Easy
You may or may not want to do this. This is set on default when you make a blog. Basically, it is where there are those colored words and you have to type them in the box. They have it just to check that computers aren't commenting, but it may prevent commenters from commenting because of the extra hassle. So its your choice if you want to do this or not.

1. Sign in to Blogger.
2. Go to your dashboard.
3. On your blog, click "Settings > Comments."
4. Scroll down to where it says, "Show word verification on comments?"
5. Click "no" and you're done!

Tuesday, 14 December 2010

How to start a new blog

Level: Easy
Hi! This is my second tutorial on this blog. This is about how to start a new blog. If you are looking for something to do to share your photography, opinion, etc. to your friends, family, or whoever wants to read it but don't want to stress about HTML or whatever, Blogger is an awesome option. It is quick and easy, too!

1. You will need to create a Google account. You don't need to use Gmail, but you do need a Google Account if you want to follow this tutorial, {we are using Blogger.} It's easy, you just need to create a username and password, and you're done!

2. Sign in with your {possibly} NEW account.
3. No screen shot for this, because my account is not brand new so this is not what your's will look like, but there should be a little button somewhere that says "Create a Blog." Simple, Right? So click that button and you will see a page that looks like this:

4. It's time to name your blog. You should put some thought into what you will name your blog... You should have it straight to the point and witty, if you want it to.
5. Next, choose a template. It doesn't really matter, you can change this later.
6. Your blog is done now! You can start posting right away or start designing right away, it's up to you. Have fun blogging!

Monday, 13 December 2010

FIRST TUTORIAL--- how to upload your header

Level: Easy
If you are a loyal reader of Grace Loves the beatles {wink, wink}, you would have seen this on my other blog. I will try to post tutorials every day to every three days, but this might be hard to manage with my other two blogs, so no promises. :-) Anyway, here I go. This is the first tutorial of many.

1. Sign into blogger and go to your dashboard.
2. On the blog you want to upload your header to, click "Design."
3. Click "Edit" on the header section.:
4. A box like this will pop up:
{you may have to click on the image to view it.}
5. If you already have a header, click "Remove Image." If you don't, click "browse" and find the header.
6. This is very important: Check the box "Instead of title and description", and while it is uploading, click "Shrink to fit."
7. Click "save" and enjoy your awesomely awesome new header!

Thanks if you made it through all of that. You can request a tutorial by emailing me at gracie.drechsel@gmail.com. Thanks!